System requirements
Platform:
Windows 95
Windows 98
Windows ME
Windows NT
Windows 2000
Windows XP
Windows 2003
Windows Vista
Hardware requirements:
16MB RAM
Pentium-133 MHz
2MB Hard Disk
True Color video mode
|
Using PhotoTitle
|
Add comments, images, think bubbles
|
|
|
You can easy add comment, image or think bubble to your photo.
|
|
|
|
|
|
For adding comment you should click on this button  in a toolbar. in a toolbar.
For adding image you should click on this button  . .
For adding think bubble you should click on this button  . .
Then click on your photo where you want to place it.
You can move objects (comment, image or think bubble) on your photo.
If you don't need in objects, you can delete it by pressing delete button on a toolbar or DEL key.
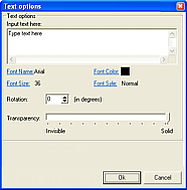
To change comment's text just double click on it.
In this box you can change text, font size, color, decoration. Also you can change transparency of this comment.
To save changes press OK button.
To change image just double click on it. Also you can resize added image by dragging black rectangles in the corners of image
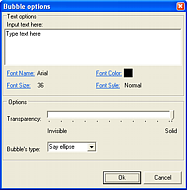
To change think bubble just double click on it.
In this box you can change text, font size, color, decoration. Also you can change transparency.
You can change type of think bubble to:
To save changes press OK button.
|
Add watermarks
|
|
|
You can mark your photos with your own watermark.
|
|
|
|
|
|
For adding watermark you should click on this button in a toolbar.
In the preferences box you can change transparency of your watermark. Usually transparency for watermark is below the 50%. Also you can change text, font size, color, decoration.
|
Add Date and Time
|
|
|
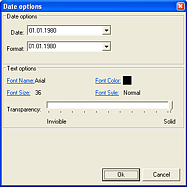
You can add Date and Time of your photo from from EXIF info.
|
|
|
|
|
|
*Exchangeable image file format (Exif) is a specification for the image file format used by digital cameras. Digital cameras will record the current date and time and save this in the metadata.
For adding the Date of photo you should click on this button  in a toolbar. in a toolbar.
For adding the Time of photo you should click on this button 
In the preferences box you can change date format, transparency, font size, color, decoration.
|
Convert your photo to sepia
|
|
|
Convert your photo to sepia
|
|
|
|
To convert your photo to sepia you should click on this button  in a toolbar. in a toolbar.
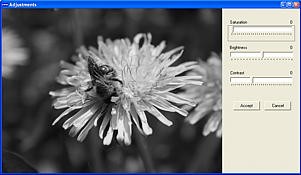
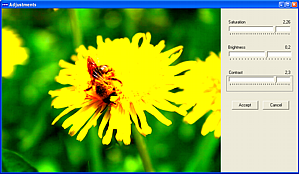
In the adjustments box you can change saturation, brightness and contrast of your photo.
To convert your photo to sepia, just move Saturation slider to the leftmost position.
|
Change Saturation, Brightness and Contrast of your photo.
|
|
|
Change Saturation, Brightness and Contrast of your photo
|
|
|
|
To change Saturation, Brightness and Contrast of your photo to sepia you should click on this button in a toolbar.
In the adjustments box you can change saturation, brightness and contrast of your photo.
You can create a lot of various effects with these adjustments. You can correct color strength, contrast and brightness of your photo.
|
Resize and Rotate your photo.
|
|
|
|
|
Resize, Rotate your photo
|
|
|
|
To resize your photo you should click this button  in a toolbar. in a toolbar.
To rotate your photo clockwise you should click this button 
To rotate your photo count clockwise you should click this button 
|
Batch processing.
|
|
|
Add your text, pictures, think bubbles to the group of photos
Add watermark to the group of photos
Change size of the group of photos
Rotate the group of photos
Rename the group of photos
|
|
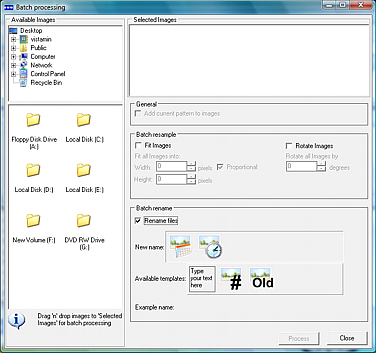
To begin batch processing you should click on this button in a toolbar.
Before batch processing you should choose what photos do you need to process.
Just drag'n'drop photos from the left side of the window to "Selected images".
You can apply all current comments, think bubbles, etc to all selected photos. For this you should check option "Add current pattern your images".
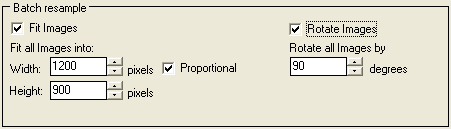
Also you can resize all selected photos. For this you should check option "Fit images" and set the new size. To batch rotating you should check option "Rotate Images" and set the angle in degrees.
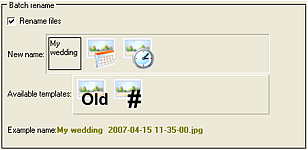
To rename all selected photos you should check option "Rename files" and set the pattern for renaming.
To rename all selected photos you should check option "Rename files" and set the pattern for renaming.
To create a new file name just drug'n'drop templates to the "New filename box".

Insert old filename.
|

Insert the Date of photo (from EXIF).
|

Insert Time of photo (from EXIF).
|
|
|

Insert the number of photo in current set.
|

Insert your own text.
|
|
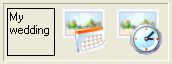
For example:
This pattern renames files to My wedding 11-05-2008 12-40-00.jpg
To start batch processing you should click "Process" button.
|